Send
Overview
Send moves an asset from your wallet to another destination inside UNIT. You can send to a person by their handle, to a Token Bank, or to a Token Treasury.
You never need a wallet address. UNIT resolves the destination for you from a handle or a token symbol. The transfer runs through four stages, shown across the top of the screen the whole way: Details, Review, Submitting and Completed. The walkthrough below follows one transfer through all four.
Before You Begin
- The recipient. A handle if you are sending to a person, or the token symbol if you are sending to a Token Bank or Treasury.
- Enough available balance in the asset you want to send, with a little spare for the network fee.
- The amount, and whether you are thinking in the asset's units or in dollars.
How to Use This Screen
The example that follows sends 5 BTCU to the $UNITCOIN treasury. Sending to a person or to a Token Bank works the same way — only the recipient field differs, and Destination Variations below sets out what changes.
Step 1 — Enter the transfer details
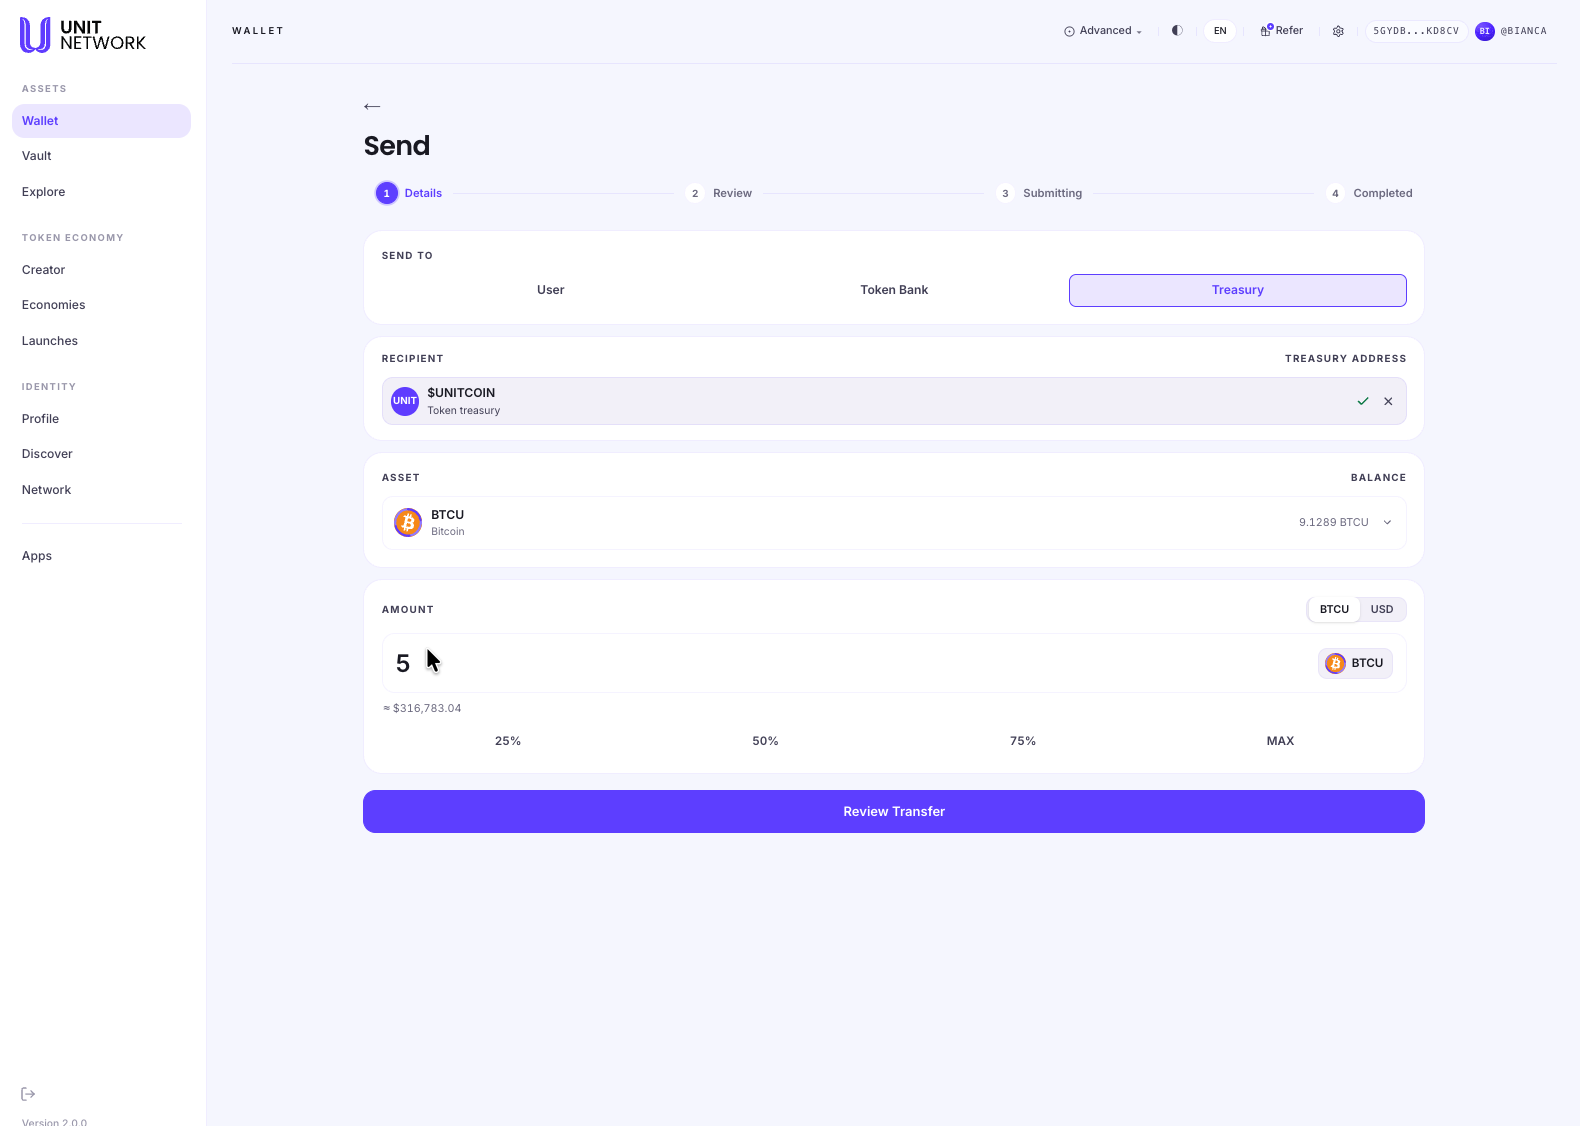
- Select Send from the Wallet.
- In Send to, choose the destination type — User, Token Bank or Treasury. This decides what the Recipient field asks for, so choose it first.
- Select the Recipient field and enter the recipient. When UNIT resolves it, the entry is replaced by a confirmed row with a tick — in the example, $UNITCOIN · Token treasury. You cannot continue until this row appears.
- Select the Asset panel and choose what to send. Your available balance for it appears on the right — 9.1289 BTCU in the example.
- Enter the Amount, or select 25%, 50%, 75% or MAX. Use the switch above the field to enter the amount in USD instead.
- Check the approximate value beneath the amount — ≈ $316,783.04 in the example — and check it against the balance shown in the Asset panel.
- Select Review Transfer.
What happens next: the screen advances to Review. Nothing has been sent, and nothing has left your balance.
Step 2 — Review the transfer
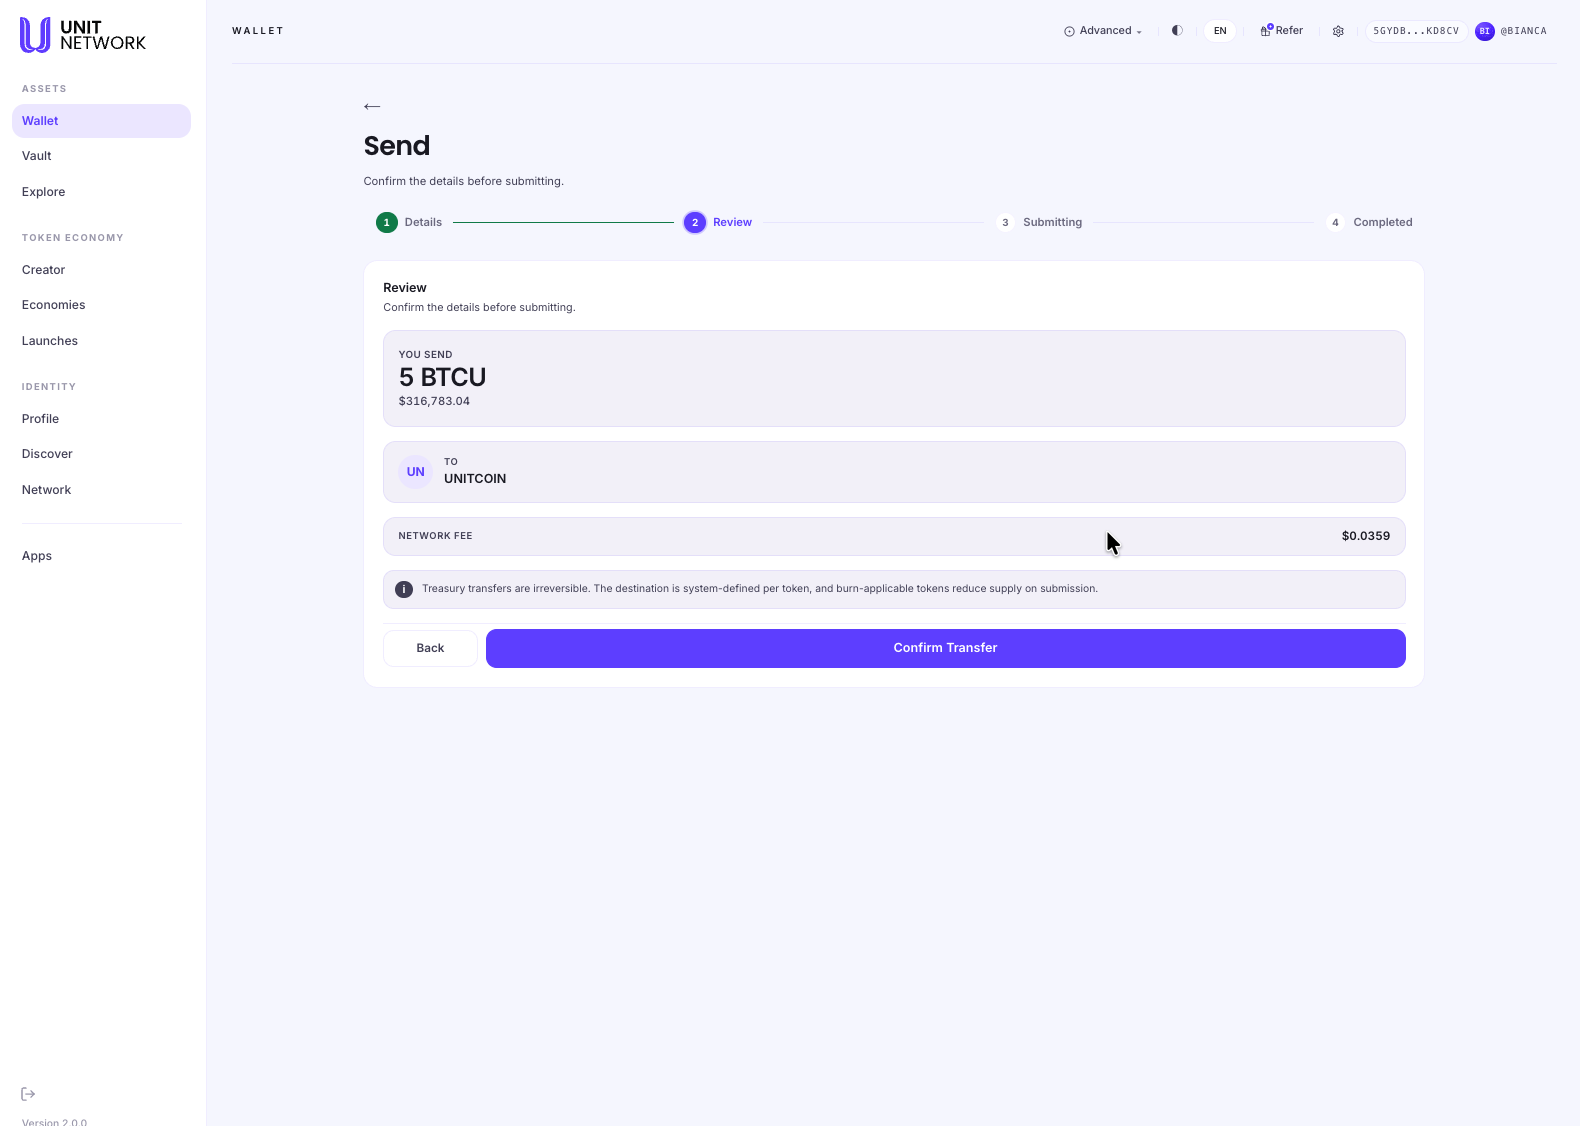
- Check You send — the amount and its value. This is the figure that will actually leave your wallet.
- Check To — the destination. For a person this shows their handle and name; here it shows the token whose treasury is receiving.
- Check the Network fee. It is charged separately from the amount you are sending.
- Read the note beneath. For a treasury transfer it warns that the transfer is irreversible and that the destination is fixed by the token rather than chosen by you.
- Select Back if anything is wrong — you return to Details with your entries intact.
- Select Confirm Transfer to commit.
A transfer cannot be reversed once confirmed. The amount and its value are fixed at this moment, so what you are reading here is exactly what will be sent. Check the destination character by character before selecting Confirm.
What happens next: the screen advances to Submitting.
Step 3 — The transfer is submitted
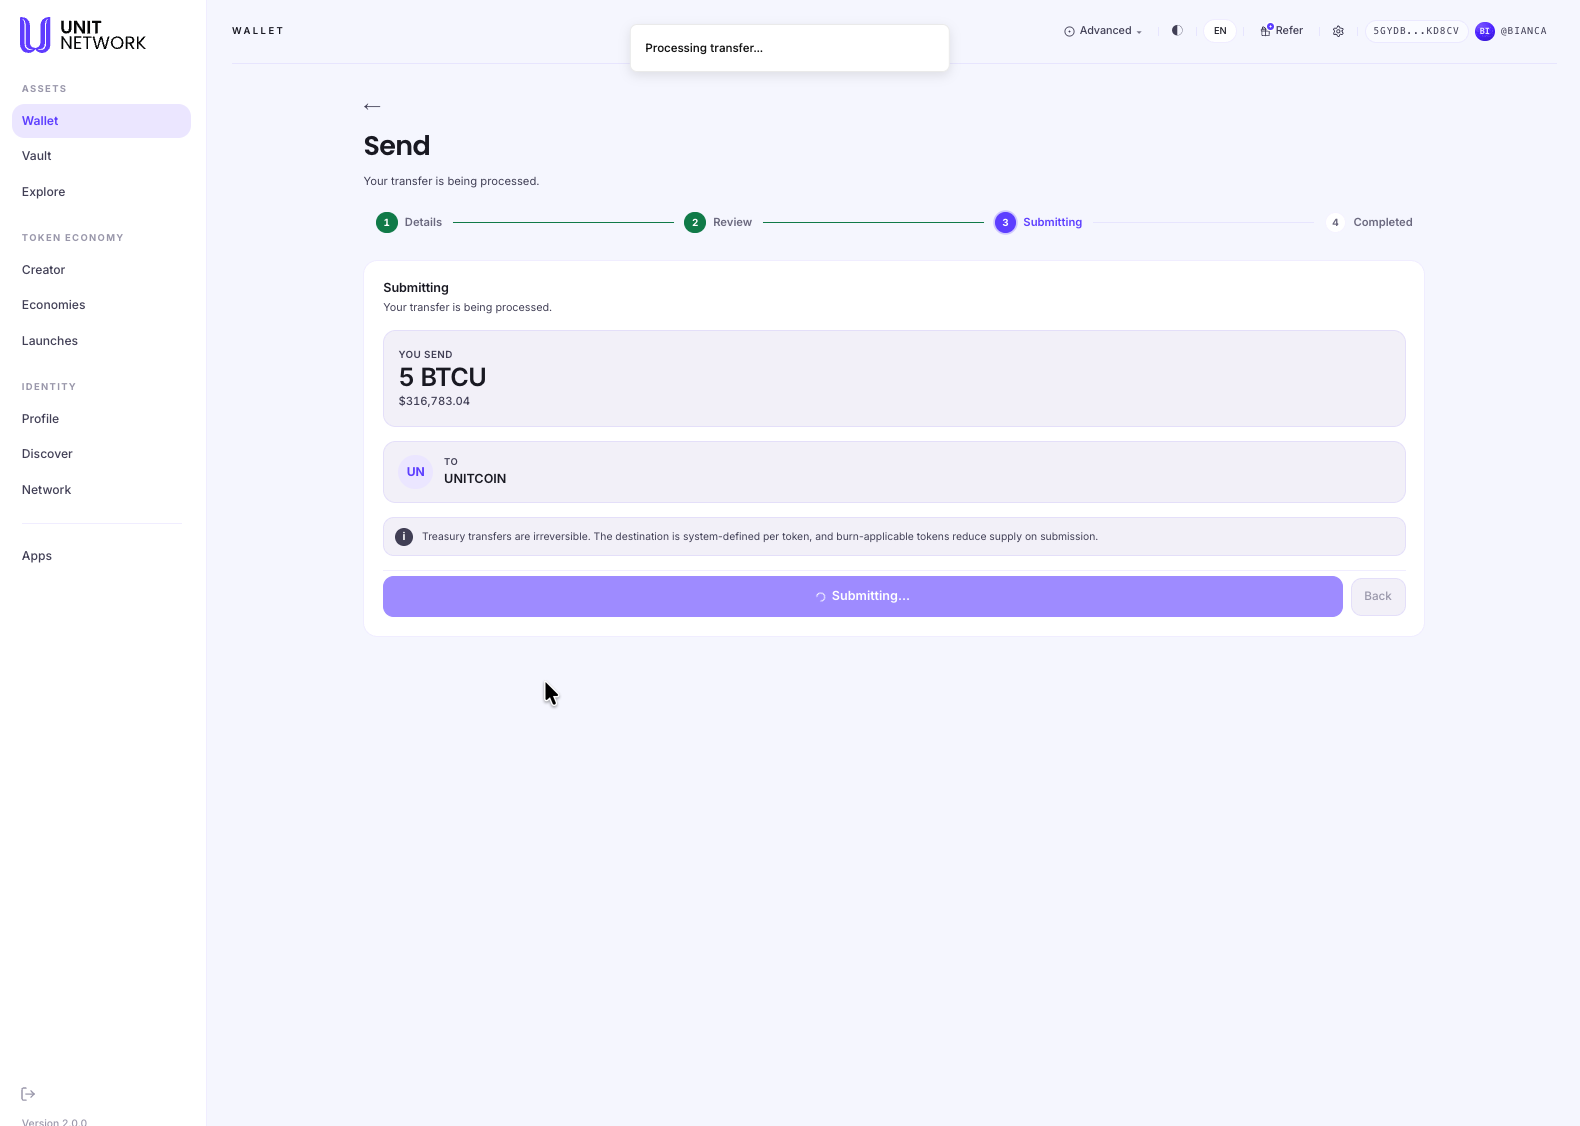
- Wait. The button reads Submitting… and a notice confirms the transfer is being processed.
- Do not leave the screen or select anything. Back is deliberately unavailable at this stage — the transfer is already with the network.
- The amount and destination stay on screen so you can see what is in flight.
What happens next: when the network accepts the transfer, the screen advances to Completed by itself.
Step 4 — The transfer is complete
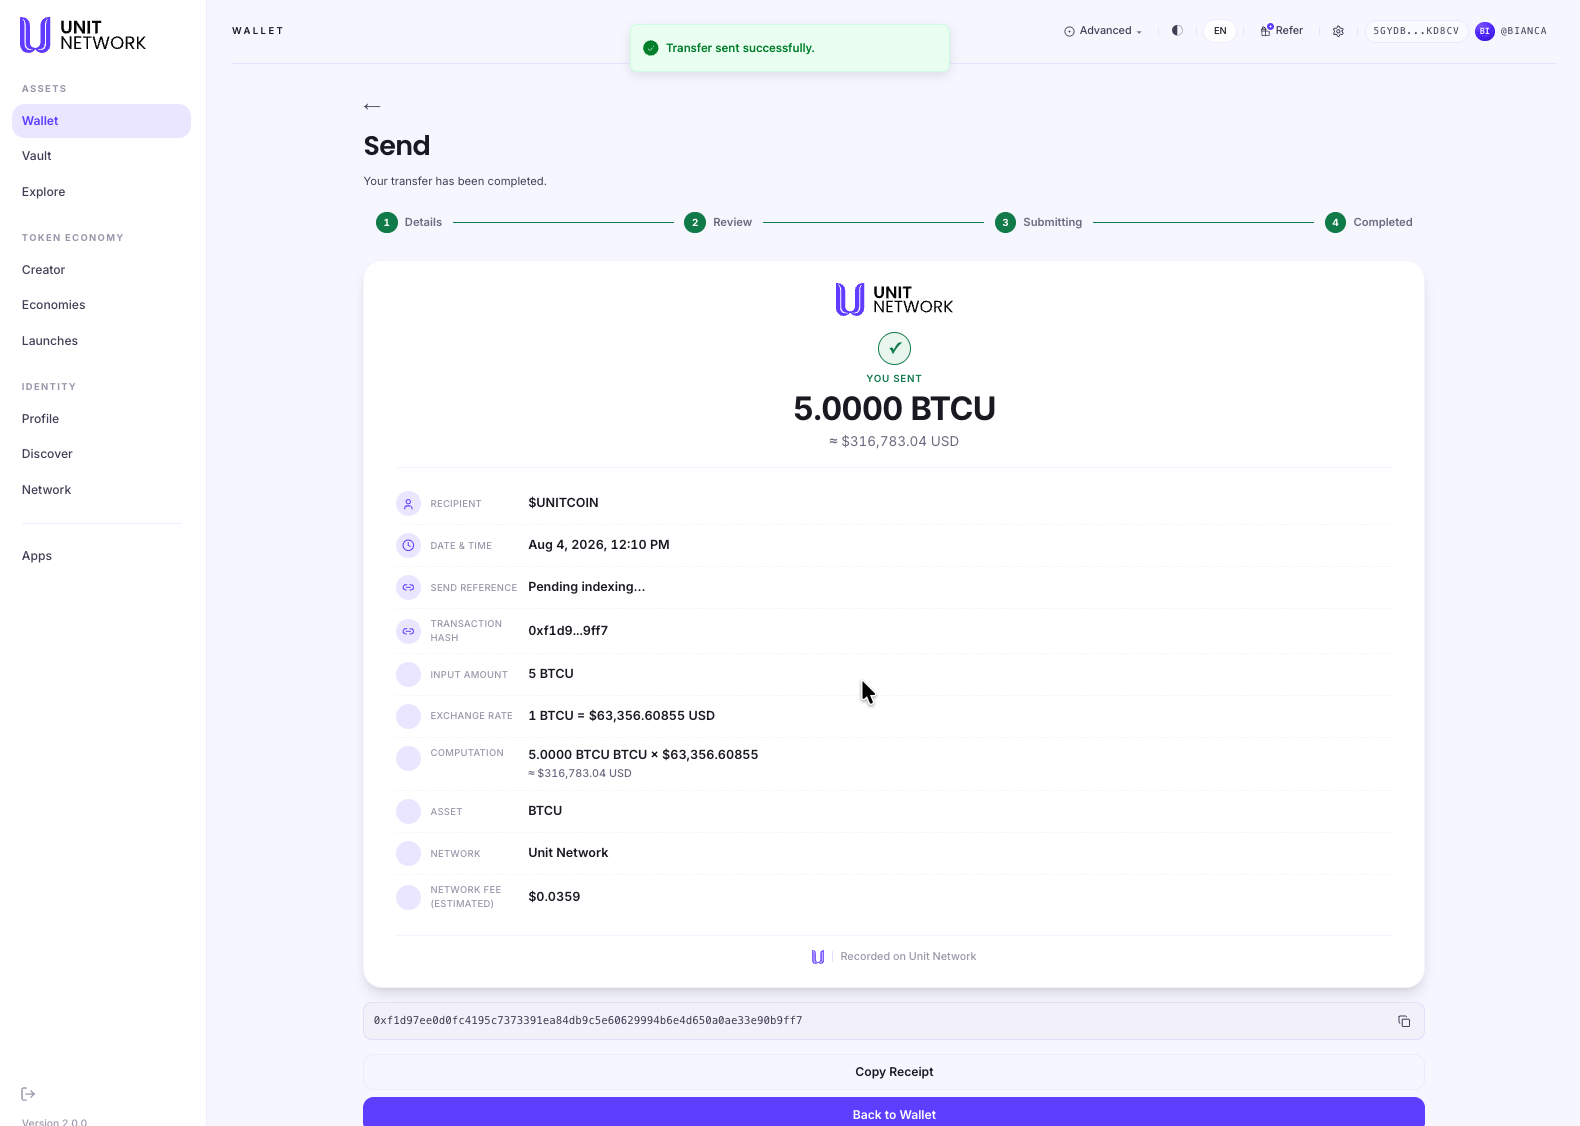
The receipt is the record of the transfer. It shows:
- You sent
- The final amount and its value, as sent.
- Recipient
- Where it went.
- Date and time
- When the transfer settled.
- Send reference
- The reference for this transfer in your records. It reads Pending indexing… for a short while immediately after a transfer, then resolves.
- Transaction hash
- The network's own identifier for the transfer, shortened here and shown in full in the copy field beneath the card.
- Input amount, exchange rate and computation
- How the value was worked out — the amount you entered, the rate used, and the multiplication. Shown so the figure can be checked rather than taken on trust.
- Asset, network and network fee
- What was sent, over which network, and what it cost.
- Check the amount and recipient one last time.
- Select Copy Receipt to copy the whole record, or use the copy control beside the transaction hash to take just the hash.
- Select Back to Wallet.
Step 5 — Find the transfer again
Every completed transfer is recorded. To find one later, open History from your profile and search by asset, recipient, reference or transaction hash. Opening a record there shows the same receipt you saw at Step 4, with the same copy controls.
A transfer to a token's treasury also appears in that token's own treasury history, under Sent to Treasury.
Destination Variations
The four stages are the same whichever destination you choose. Only the recipient step differs.
- User
- The Recipient field is labelled Unit handle and searches by username as you type. Select the person from the results — the field then shows their handle and display name with a Verified tick. Typing a handle without choosing it from the list does not count as selecting a recipient. The review note reads simply that transfers cannot be reversed once submitted.
- Token Bank
- The Recipient field takes a token symbol rather than a handle, and resolves to that token's bank. There is no person to search for.
- Treasury
- The Recipient field is labelled Treasury address and takes a token symbol, resolving to that token's treasury — the example above. The destination is fixed by the token itself, which is why the review stage warns that it is system-defined. For tokens where it applies, sending to the treasury also reduces the circulating supply.
Tips
- Wait for the recipient row to resolve. A recipient that has not been confirmed is the most common reason Review Transfer will not proceed.
- Use MAX rather than typing your whole balance — MAX leaves room for the network fee.
- Switch to USD if you are thinking in dollars; it is easier to sanity-check an amount you recognise.
- Copy the receipt at Step 4. It is the quickest way to confirm a transfer to someone else, and it saves searching History later.
- If the value beneath the amount shows a dash, no current price is available for that asset. Enter the amount in the asset's own units.
Related Screens
- Receive — the other half of a transfer
- Wallet Overview — where Send starts and where the balance change appears
- Withdraw — for sending to an address outside UNIT
- History — where completed transfers are recorded
- Treasury — where treasury transfers also appear
Frequently Asked Questions
- Can I send to a wallet address?
- Not with Send. Inside UNIT you send to a handle, a Token Bank or a Token Treasury, and UNIT resolves the destination. To send to an address on another chain, use Withdraw.
- Is the amount I see the amount that is sent?
- Yes. The amount and its value are fixed when you confirm at Step 2, so what you reviewed is what is sent — and the receipt at Step 4 shows the calculation.
- What is the difference between the send reference and the transaction hash?
- The reference identifies the transfer in your UNIT records; the transaction hash is the network's own identifier. The receipt shows both.
- Why does the send reference say "Pending indexing"?
- The transfer has settled but its record is still being written. The transaction hash is already final and can be copied immediately.
- Why does MAX leave a small amount behind?
- Because the network fee is paid from the same balance. MAX is the largest amount you can send and still cover it.
- Can I cancel a transfer?
- You can go Back at Step 2, before confirming. After that it cannot be reversed — which is why Back is unavailable at Step 3.
Troubleshooting
- Review Transfer will not proceed
- Check each panel in turn. The recipient must be a confirmed row with a tick, not just typed text; an asset must be chosen; and the amount must be above zero and within your available balance.
- The recipient cannot be found
- Check the spelling. Search matches handles rather than display names, and the recipient must be selected from the results.
- The available balance is insufficient
- Check whether the balance you were counting on is staked. Staked value appears in your total but cannot be sent until it is unstaked.
- The screen is still submitting
- Wait — the transfer is with the network and the screen advances by itself. Do not go back or resubmit, which risks sending twice.
- I closed the screen before copying the receipt
- Nothing is lost. Open History and find the transfer; the same receipt is there.